Thursday 5 December 2013

My Journey with the Elizabethans - Assessment Outcomes


The assessment was quite a daunting experience, as it was our first ever assessment of the course and no one really knew what to expect or how it was pan out.  During the first week of assessments, I had my design created on me by my partner Ashleigh.  We had practiced my look previously, however I was still nervous as to how it would turn out on the day.
Having to sit in the chair and not be able to say anything to your partner was really frustrating, as I wanted to be the creator and not the one being created on.  I was a bit anxious as to whether or not Ashleigh would have time at the end to go back and touch up any bits that needed doing, as she took longer on the hair than she had when practicing before.  I think that this was down to nerves though, and she did just have enough time to powder over my face once more.
I was quite pleased with the outcome of Ashleigh's creation of my design and I felt that the assessment was quite successful overall.  The only thing that I might criticise Ashleigh on, is that she didn't initially powder my face well enough, however it turned out alright as she got the chance to go over it again at the end.
Below are some of the final images from the assessment.


In the second week of assessments, it was my turn to create Ashleigh's design on her.  We had practiced it previously when it had gone to plan, although I was still slightly nervous that something could go wrong during the assessment.
This week, I felt a lot more comfortable, being the one in charge of the creation rather than having to sit and anticipate how it would turn out.  Although this time I had to worry about whether or not I was creating my partner's design to her standards and the way that she wanted me to.  I kept to the allotted times well, and finished the make-up with a few minutes to spare, giving me extra time to go back at the end to touch up any areas that needed it.  Ashleigh's make-up design was fairly simple, yet it took me a while to buff the foundation in properly as the Illamasqua Rich Liquid Foundation is really think and difficult to get even.
I think that I managed my time well, and that I did a fairly good job with her design.  I was happy with the outcome of my creation of Ashleigh's design and I hope that she was too.
Below are some of the final images from the assessment.


Friday 29 November 2013

My Journey with the Elizabethans - My Partner's Design

For the assessment, we will be working with our partner's make-up looks that they have designed and we will be creating them on them.  Ashleigh's design uses a pale skin base, rosey cheeks, a white eyeshadow with red eyeliner, mascara, an ombre lip and a stencil design at the side on her temple.

Ashleigh's make-up design has elements that I feel I will be able to create well and hopefully in the way that she wants me to.  In order for me to understand Ashleigh's make-up design properly, we went through it together in our studio session this week.  Ashleigh provided me with a set of instructions telling me exactly how to recreate her look and when I was practicing her design we went through and made a few changes to her look to make it look better.  For example, originally she was going to have black eyeliner, however we thought that a red liner might link better with the lips to tie the look together a bit better.  We also decided that the stencil was going to take too much time to do on the day of assessment, so Ashleigh has decided to replace it with some Polka Dot PAPERSELF Lashes.

Below is the step by step that Ashleigh provided me with:

Equipment needed:
Kryolan foundation palette
Illamasqua white foundation
Matte primer
Illamasqua loose powder
Illamasqua powder blusher, Tremble
Sleek white eye shadow
Rimmel London Scandaleyes mascara
Kryolan lip palette, LC010
MAC lip pencil, Black Black
PAPERSELF Polka Dot lashes
Lash glue
Foundation brush
Buffing brush
Concealer brush
Powder brush
Highlighting brush
Eye shadow brush
Angled brush
Lip brush
Disposable mascara wands


Step by step guide:
- Mix my partner’s foundation shade with the Illamasqua white foundation and matte primer
- Apply the base to the face, ears and neck using the foundation brush and buff in well
- Using a disposable mascara wand and the white foundation, whiten out the eyebrows and comb in an upward direction to make the hairs stand up
- Tidy up any small areas that may have been missed out using the concealer brush and powder the skin well using the powder brush
- Using the highlighter brush, apply the blusher to the apples of the cheeks in a circular motion and drag the colour back slightly towards the outer of the face
- Apply the white eye shadow across the eyelids and up to the brow bone
- Use Kryolan lip colour LC010 as an eyeliner and the angled brush to apply it to the top of the eyelid
- Use a disposable mascara wand to apply mascara to the eyelashes, top and bottom
- Then apply the Polka Dot lashes to the top and bottom lashes of the left eye
- Complete the look by applying the ombre lip colour.  To create this look, apply lip colour, LC010, to the whole lip, ensuring that the lip line is crisp and clean.  Then take the MAC lip pencil and apply a smaller area on the inner of the top and bottom lip

Wednesday 20 November 2013

My Journey with the Elizabethans - My Final Design

For my final make-up design, I have decided to go with the deep purple design with the Antique Jewellery lashes.  I have chosen this design, because it is the design that I was most passionate about when creating the face chart.  I also believe that this design has more meaning behind it, whereas the other two were just created because I thought that they looked slightly Elizabethan mixed with contemporary twists.


When trialling my design, I played around with various extra details in the eyebrow and on the lips.  Because I didn't want to block out my eyebrows like they did in the Elizabethan era, I wanted to make them stand out even more.  To do this, I played around with adding a small line of eyeliner either above the eyebrow or below it.
I think that the line underneath the arch of the eyebrow (shown on the left) worked best, as this made the eyebrow seem lifted and appear fuller, making them stand out more, which is what I wanted.
I also played with some of the lip techniques that we learnt in the 'Lip Trip' workshop, and I decided on gradient lip (also shown on the left), using a slightly darker shade of lipstick to outline the lips and make them stand out even more.

Having experimented with my look myself before handing it over to my partner, I could overcome any problems that might have occurred and explained to her how to overcome them as well if she were to face the same problems.

Communicating my design to my partner:
So that my partner, Ashleigh, can create my make-up design in the way that I want her to, I have created a pack for her.  The pack includes my initial face chart of the design, the images displayed above of how I want the outcome to look and a step by step guide of how to create my look.  This is explained below:


Equipment needed:
Kryolan foundation palette
Illamasqua white foundation
Matte primer
Illamasqua cream powder, Laid
Illamasqua powder blusher, Ambition
Illamasqua loose powder
Urban Decay cream eyeliner, Zero
PAPERSELF Antique Jewellery Lashes
Lash glue
Kryolan lip palette, LC010/ LC009
Foundation brush
Buffing brush
Concealer brush
Powder brush
Contouring brush
Highlighting brush
Eye shadow brush
Angled brush
Lip brush


Step by step guide:
- Mix my foundation shade, Illamasqua Rich Liquid Foundation, White and Illamasqua Matte Primer together
- Apply base to the face, ears and neck, making sure to buff in well
- Apply Illamasqua Cream Blusher, Laid to the cheek bones and blend into the skin to get rid of any harsh lines
- Powder all skin that is covered in foundation heavily to make sure that the make-up sets using a powder brush
- Apply Illamasqua Power Blusher, Ambition on top of the cream blusher and blend in, again to avoid any harsh lines
- Apply Urban Decay Cream Eyeliner, Zero to the top eyelid
- Also apply a thin line of Urban Decay Cream Eyeliner, Zero to the underneath arch of the eyebrows
- Apply Kryolan Lip Palette, LC010 to the whole lips.  Then mix a small amount of LC010 with a scraping of LC009 and apply this darker colour to the outline of the lips, blending it towards the middle of the lip to create an ombre lip effect
- Apply Paperself Antique Jewellery Lashes to upper and lower lash lines, ensuring that the teardrop ends are at the corners of the eye


Sunday 17 November 2013

My Journey with the Elizabethans - My Three Designs

In order to make our designs clear and concise when presenting them to our partners, we created three possible final design face charts.  On these face charts we created our designs using the products that we would use when creating the proper design.  At the side of the design,  I wrote a list of the products that I used and on which area of the face, so that my partner can refer to it and be clear with what she is doing.  Below are my three ideas, all of which would have a pale face created from a mixture of my colour foundation with the Illamasqua Rich Liquid Foundation, White.

My first face chart  uses quite a neutral palette of colours, with the beige colours on the eyes and darker brown lips.  I have also drawn on the pattern of the Antique Jewellery PAPERSELF Lashes on the eyebrows so that you can see where they would be positioned.
To create this design, I would start of with the white base all over the face, ears and neck.  I would then add colour to the cheeks using Illamasqua Powder Blusher, Disobey.  After that I would create a subtle contoured eye effect  on the eyelids using Sleek Original palette.  I would add a thin line of eyeliner to the eyelids and a touch of mascara before filling in the lips with Kryolan Lip palette, LCP694.  I would finish my look off by sticking the Antique Jewellery Lashes over the eyebrows.
I feel that this design is a good example of a contemporary Elizabethan make-up look, as the base is quite pale and the colour on the cheeks and eyes is also quite subtle.  The contemporary twist in this design is the dark shade on the lips and the fact that it is a  neutral palette being used, as neutral colours weren't used during the Elizabethan era, just pinks and rouges.
I originally created this face chart in response to our 'Lash Deco' workshop, but I really like it and feel that it could work successfully as a contemporary Elizabethan design.  I think that it is an effective design, because it has bot Elizabethan and modern traits within it.  I like the way that I have positioned the PAPERSELF lashes on the eyebrows, as I feel that they look a bit like a crown and they frame the face nicely.

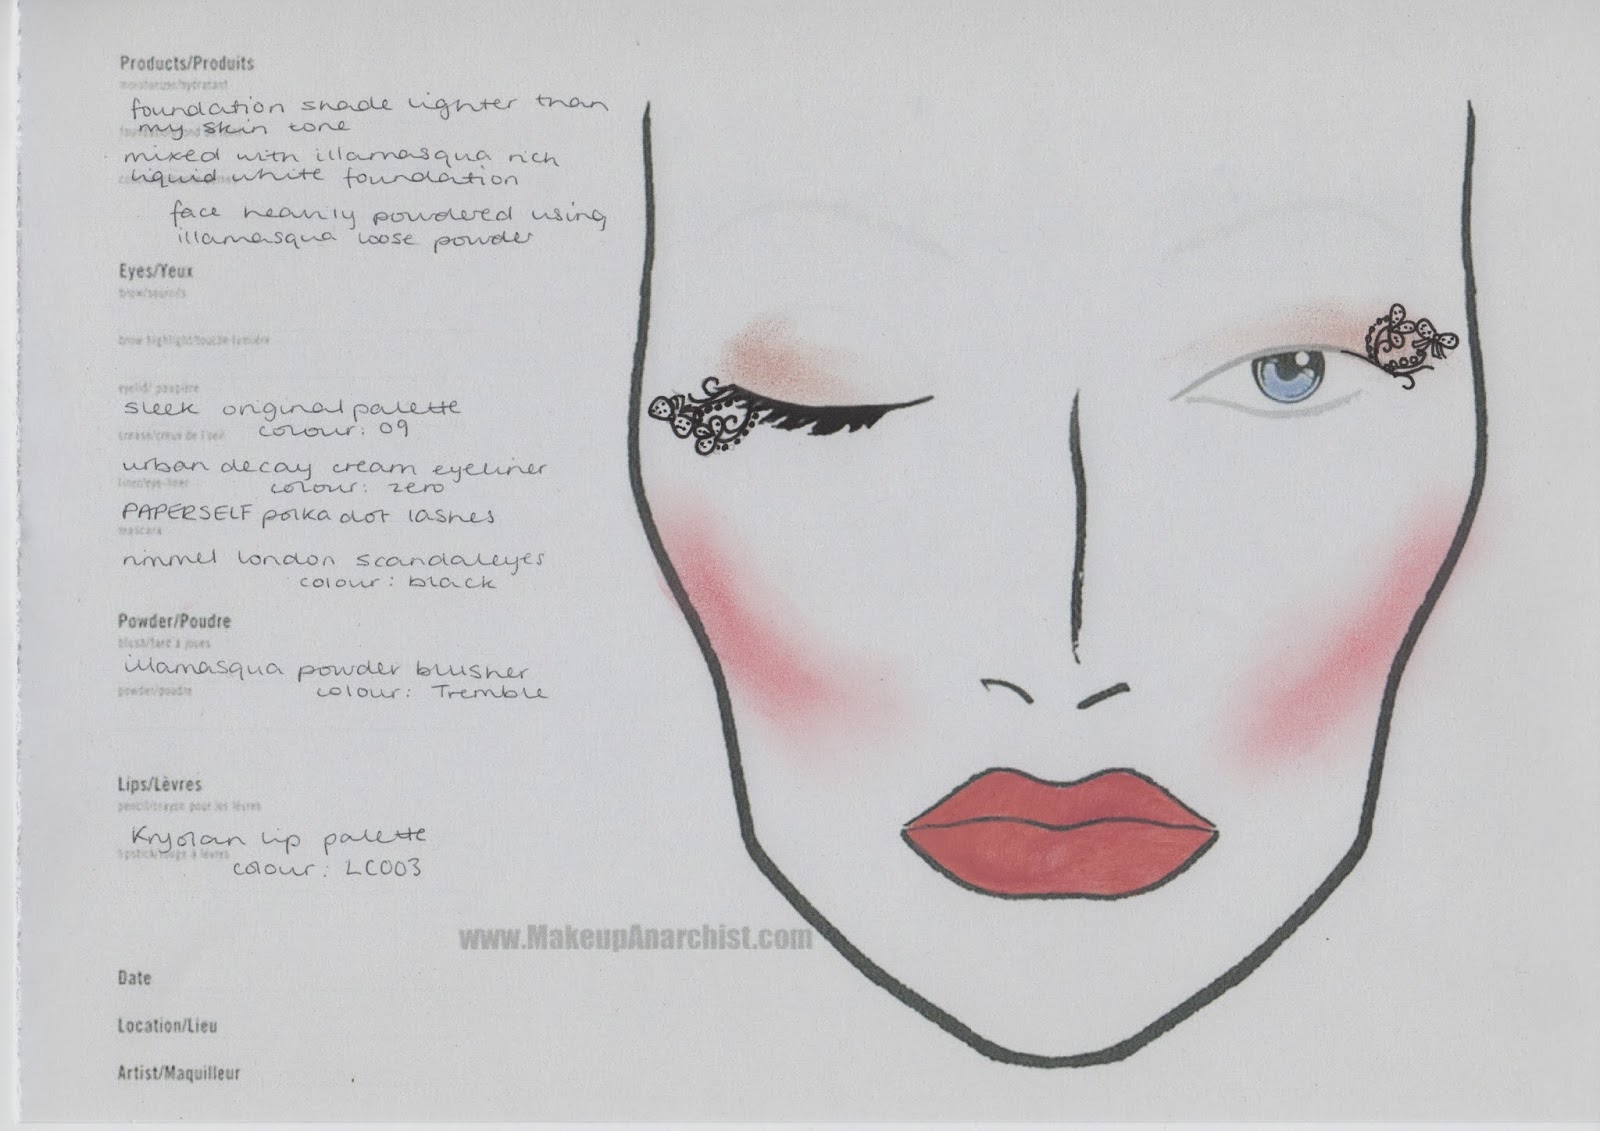
My second face chart  uses more rosey pink colours, with the traditional Elizabethan rosed cheeks and lip.  I have also added a touch of pink eyeshadow in the outer corners of the eyes to carry the colour theme up throughout the face.  I have also drawn on the pattern of the Polka Dot PAPERSELF Lashes on the outer, upper lashes.
To create this design, I would begin by applying the pale foundation base all over the face,  ears and neck being sure to powder it well.  I would then apply Illamasqua Powder Blusher, Tremble to the cheeks.  After that I would apply a small touch of Sleek Original palette, Pink to the outer corners of the eyelids.  I would then add a touch of mascara to the top and bottom lashes, but not too much, before applying the Polka Dot PAPERSELF Lashes on the outer upper lashes.  I would complete the look by adding Kryolan Lip palette, LC008 to the lips.
I feel that this design is a good contemporary Elizabethan look, with a few more Elizabethan details than contemporary, but it could still work.  This look is very Elizabethan with the pale skin and pink cheeks and lips, however I have made it more contemporary by adding the pink to the eyelids and by using the PAPERSELF lashes.
I think that this design is quite effective, because although it is a fairly simple design, there are still detailed elements that makes it more interesting.  For example, the eye area.

My third face chart uses a darker purple palette for the cheeks and lip.  I have decided to not use eyeshadow in this design, just a line of black eyeliner on the eyelid, keeping close to the lash line.  I have also drawn on the pattern of the Antique Jewellery PAPERSELF Lashes in the position that I want them to be on my lash lines.
To create this look, I would begin by applying the pale foundation base all over the face,  ears and neck.  I would then apply Illamasqua Cream Blusher, Laid to the cheeks, powder the face, ears and neck before then applying Illamasqua Powder Blusher, Ambition.  After that I would apply a line of mascara to the eyelids and then I would apply. the Antique Jewellery PAPERSELF Lashes on the upper and lower lashes.  I would complete the look by adding Kryolan Lip palette, LC010 to the lips.
I feel that this design is a good contemporary Elizabethan look, with an equal amount of contemporary and Elizabethan aspects to it.  This look is Elizabethan with the pale skin and areas if the face that are highlighted with colour (the cheeks and lips).  It is contemporary in the fact that I chosen to use deep purple colours to highlight the cheeks and lips and I have made it more modern by having more detail around the eye area.  Also, although purple was not the standard colour to be used to highlight the cheeks and lips during the Elizabethan era, it was a colour that the Elizabethans considered to symbolise royalty, which is why I chose that to be the colour to go on my cheeks and lip.
I think that this design is quite effective because of my meaning behind the look.  I also think that the extra detail in the eye area really adds to the effect of the look.  This is because it makes the eyes bolder, which reflects the bold purple lip, bringing the whole look together.

Saturday 16 November 2013

The Make-Up Studio - CONTEMPORARY ELIZABETHAN MAKE-UP


In this week's studio session, we were looking at how to create a contemporary Elizabethan make-up look, in order to begin preparing for our final face chart designs.  We looked at a contemporary Elizabethan look and created our own interpretation of it on our partner.


Equipment used:
Kryolan foundation palette
http://lapetitefashionista.blogspot.co.uk/2010/11
/fashion-royalty.html
Illamasqua white foundation
Matte primer
Illamasqua powder blusher, Ambition
Illamasqua loose powder
Sleek eye shadow palette, Au Naturel
Urban Decay cream eyeliner, Zero
Rimmel London Scandaleyes mascara
Kryolan lip palette, LC010
Foundation brush
Buffing brush
Concealer brush
Powder brush
Contouring brush
Highlighting brush
Eye shadow brush
Angled brush
Lip brush
Disposable mascara wand


How to create a CONTEMPORARY ELIZABETHAN LOOK
Mix your model’s correct foundation shade on the back of your hand with the white foundation and matte primer
Apply all over the skin, including ears and neck, using the foundation brush and buff in well using the buffing brush
Powder the face well using the powder brush
Apply the blusher to the cheek bones using the contouring brush, and blend away any harsh lines created using the highlighting brush
Using three eye shadow colours of your choice (I used Taupe, Conker and Mineral Earth from the Sleek eye shadow palette) create a contoured eye shadow effect as practiced in week five
Add a eyeliner to the top and lower lash lines using the angled brush and finish off the eyes by adding a touch of mascara to the lashes by using a disposable mascara wand
Then add the lip colour to the lips, being sure that you get the lip line perfect